Here’s the thing: a KitchenAid dishwasher is not just another appliance; it’s an investment in making your daily life easier. When it acts up, you want to get it back in shape quickly, and that’s where understanding how to claim a warranty can really save the day. Let me explain the process clearly so you can tackle it confidently, no confusing jargon or unnecessary hurdles.
Understanding Your KitchenAid Dishwasher Warranty
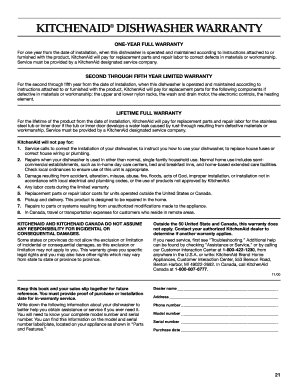
Before diving into claims, it’s crucial to understand what your KitchenAid dishwasher warranty actually covers. Think of the warranty as a promise from the manufacturer that your appliance should work as expected for a certain period. Most KitchenAid dishwashers come with a **limited warranty**, often lasting one year for parts and labor, but sometimes longer for specific components.
What’s covered? Typically, your warranty will include repairs or replacements for defects in materials or workmanship under normal household use. For example, if the dishwasher doesn’t drain properly or the heating element fails without any user mishandling, that’s usually covered. However, things like damage from misuse, accidents, or improper installation usually aren’t included.
You might be wondering, “What about extended warranties or service plans?” Those are sometimes sold separately and can lengthen your coverage beyond the standard period. It’s worth checking any paperwork you have or your purchase receipt to see what applies to your specific dishwasher model.
Gathering Your Documentation Before Claiming
Here’s a little story: I once tried to claim a warranty for a blender, but I had lost the receipt and warranty card. The company wouldn’t proceed without proof of purchase, and I ended up paying out of pocket. Lesson learned—keep your documents handy.
When preparing to claim a warranty for your KitchenAid dishwasher, **gather these key items**:
- Proof of purchase: Original receipt or invoice showing when and where you bought it.
- Warranty information: Any warranty booklets or cards that came with your dishwasher.
- Dishwasher model and serial numbers: Usually found inside the door or on the frame.
- Photos or videos: These can help demonstrate the problem when you contact support.
Having these ready is like bringing your ID and ticket before boarding a flight—you can’t get far without them. It speeds up the process and proves that your dishwasher is eligible for service.
How to Identify if Your Dishwasher Issue is Warranty-Related
Not every glitch means it’s time to pull out your warranty. Here’s the thing: some dishwasher problems are simple fixes you can handle yourself, while others signal deeper issues that warranty service is designed to address.
If your dishwasher won’t start, the first step is to check basic troubleshooting:
- Is it plugged in?
- Is the circuit breaker tripped?
- Have you reset it according to the manual?
- Are buttons and controls responding?
If the problem persists after these checks, it’s likely related to a component failure covered by the warranty. For instance, if the dishwasher’s motor, control board, or water inlet valve isn’t working properly without any user error, that’s when you want to move forward with a claim.
Step-by-Step Guide to Claim Your KitchenAid Dishwasher Warranty
Okay, so you’ve spotted a qualifying problem, and you have your paperwork ready. Now, what’s the actual process to claim your warranty? Here’s a simple step-by-step approach:
1. Contact KitchenAid Customer Service
Reach out to KitchenAid’s support line, either by phone or online through their official website. It’s best to use the phone if you want a more direct conversation and quicker responses. Be ready to provide your dishwasher’s model number, serial number, and details about the problem.
2. Explain the Issue Clearly
Describe what’s wrong in plain language. For example, instead of just saying “not working,” say something like “the dishwasher stops mid-cycle and makes a clicking noise.” These details help the technician diagnose remotely and decide the next steps.
3. Follow Their Instructions
The representative may guide you through some troubleshooting or schedule a repair with an authorized service technician. They might also ask you to send proof of purchase or warranty info via email.
4. Schedule a Service Visit
If a repair is needed, KitchenAid usually arranges for an authorized technician to come to your home. This is part of the warranty service, so often, you don’t pay for the service call or parts if the issue is covered.
5. Keep Records of Your Communications
Make notes of names, dates, and details during your interactions. If any delays or issues pop up, having this info will make follow-ups easier.
What to Expect During and After the Warranty Repair
You might be wondering how long the whole warranty repair process takes. Honestly, it varies depending on your location, technician availability, and the part needed. However, most repairs are completed within a few days to a couple of weeks.
When the technician arrives, they should have all the necessary tools and replacement parts if the problem is straightforward. Sometimes, if the issue is complex or requires special parts, the dishwasher might need to be serviced at a repair center or replaced.
After the repair, test your dishwasher right away. If it’s still acting up, contact KitchenAid again. Warranty service aims to fix the problem once and for all, so don’t hesitate to follow up if needed.
Common Pitfalls When Claiming a Warranty and How to Avoid Them
Here’s a little insider tip: many warranty claims get delayed or denied because of simple mistakes that are easy to avoid.
- Not registering your product: Some warranties require product registration within a certain timeframe after purchase.
- Missing paperwork: Keep your receipts and warranty card safe and accessible.
- Unauthorized repairs: If you or someone else tries to fix the dishwasher before a warranty claim, it might void your coverage.
- Ignoring care instructions: Using the wrong detergent or overloading can cause damage not covered by the warranty.
Keeping this in mind will make the warranty claim process smooth and hassle-free, saving you both time and money.
When Warranty Coverage Ends: What Are Your Options?
If your KitchenAid dishwasher’s warranty has expired, don’t despair just yet. You still have a few options:
- Pay for out-of-pocket repairs: In some cases, parts or service might be affordable.
- Check for extended warranties: If you purchased one, verify whether it’s still active.
- DIY troubleshooting: Certain common issues, like clogged spray arms or filter cleaning, can be fixed without professional help.
- Consider replacement: After weighing repair costs, sometimes buying a new model is more cost-effective.
An expired warranty isn’t the end of the road, but taking good care of your dishwasher from the start helps avoid surprises down the line.
Final Thoughts on Navigating KitchenAid Dishwasher Warranty Claims
Honestly, claiming a warranty for your KitchenAid dishwasher doesn’t have to be a headache. Think of it as a conversation with a helpful friend who knows all the ins and outs—once you know what to say, what to show, and what to expect, the process flows smoothly. The key takeaway is to stay organized, be clear about the problem, and communicate promptly with KitchenAid’s support.
Your dishwasher’s warranty is there to protect you from unexpected repair bills. Treat it like a valuable safety net—keep your documents safe, follow simple troubleshooting steps first, and don’t hesitate to reach out when something’s off. With these tips in hand, you’ll handle warranty claims like a pro, keeping your kitchen running smoothly without the stress.