Let’s be real—Rheem is a well-known brand for heating and cooling, but their warranty terms and claim process aren’t exactly a chatty neighbor. If you’re staring at your paperwork, remote in hand, and wondering where to start, you’re not alone. Think of claiming a Rheem warranty like hitting the “reset” button on your system’s troubles. It’s supposed to sync you up with the help you need, but only if you know how to pair all the right steps together. Let me walk you through it—one simple, plain-English step at a time.
What Does A Rheem HVAC Warranty Actually Cover?
Honestly, the word “warranty” can sound like a magical shield, but the fine print matters. For Rheem HVAC systems, warranties typically kick in to cover parts that might fail due to manufacturing defects. What does that mean? Well, if a component inside your air conditioner or furnace stops working—say, the compressor, coils, or motor—because of how it was built, you’re likely covered. But, if the problem is because of normal wear, skipped maintenance, or a botched DIY repair, you might be left out in the cold.
Now, some Rheem warranties last for five years, while others extend to 10 years, especially if you register your product right after purchase. That registration is a big deal—think of it like syncing your remote: if you skip it, your coverage might be shortened. Most warranties won’t cover labor fees (what the technician charges you for time), only the cost of replacement parts. So, if your system needs a new circuit board, the part itself may be free, but getting someone to swap it out often isn’t.
Here’s the thing: warranties can vary by model, installer, and even region. Always check your owner’s manual or the Rheem website for your specific terms. And if you’re ever unsure, try calling their customer support—they’re like the troubleshooting guide for fine print. Just have your model number and installation date handy, like you would when resetting a remote with a code.
How To Register Your Rheem HVAC System (And Why It Matters)
Let me explain—registering your Rheem HVAC system is kind of like pairing a new remote; nothing works quite right until you do it. When you buy and install a Rheem unit, you’ll usually get standard warranty coverage by default. But, if you register within 60 days (sometimes 90, depending on the product), you can unlock extra years of protection, almost like a bonus round.
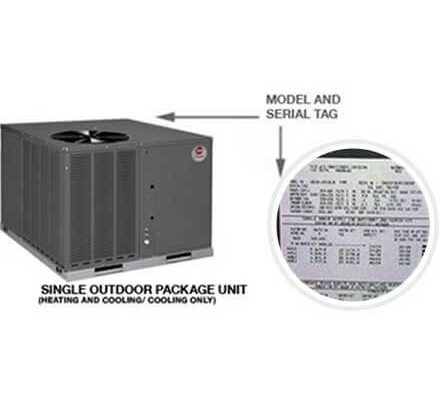
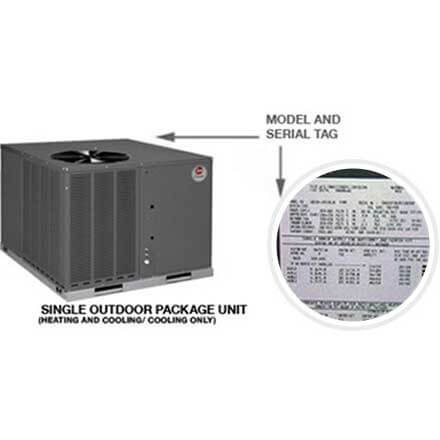
Registration can be done online at the Rheem warranty portal. You’ll need some info:
- Model and serial number (usually found on a sticker on the outside of your unit)
- Installation date
- Contact information for you and your installer
Don’t have your paperwork? No worries. Most techs put a label on the system with these details, or you can check your purchase receipt. Entering the wrong info is a bit like putting the wrong code into a universal remote—it won’t sync, and your extended coverage won’t activate.
Once you’ve filled in everything, submit the registration form. You should get a confirmation by email. If you don’t, double check your spam folder or try again—sometimes website glitches happen. Proper registration means that, down the road, there’s no debate about whether you’re covered or how long the coverage lasts.
Step-By-Step: How To Start A Rheem Warranty Claim
Starting a warranty claim with Rheem doesn’t have to be stressful. Here’s how I’d walk through it:
- Gather your documents: You’ll need your system’s model and serial number, proof of installation or purchase, and your registration confirmation (if you have it).
- Contact your installer or dealer: In most cases, Rheem wants you to go through the company or contractor who installed your HVAC system. They’re like your main point of contact—sort of like calling your tech-savvy friend before rebooting your Wi-Fi router.
- Describe the problem: Be as specific as possible. Is your unit not cooling? Are you hearing weird noises or getting error codes? The more info, the faster the diagnosis.
- Your installer will verify the issue: Sometimes, what feels like a warranty problem is just a quick reset, battery change, or minor troubleshooting step. If it’s a covered component failure, they’ll help you submit the claim to Rheem.
- The claim gets processed: If approved, Rheem will ship the necessary replacement part (or authorize a swap from local stock). Your installer will handle the actual repair.
The key is being patient—claims can take a few days to process, and shipping times depend on the part and your location.
If you go directly to Rheem, they’ll likely refer you back to the installer. The only exception is if you live in a remote area or the dealer is no longer in business; in that case, Rheem’s customer support can help you find an authorized technician.
Common Problems When Claiming A Rheem Warranty
You might be wondering, “What could possibly go wrong?” More than you’d expect, unfortunately. The two biggest hiccups are missed registration and incomplete documentation. If your unit wasn’t properly registered within the timeframe, you might only get the shorter base warranty (often just five years). It’s like forgetting to save your progress in a video game—annoying, but fixable if you act fast.
Sometimes, people toss their paperwork or lose the original receipt. Without proof of installation, it’s difficult for Rheem to verify when your warranty period started. Snap a photo of your system’s nameplate and serial number—with your phone, if you must—and email yourself a copy to prevent future headaches.
Another snag: some claims are denied because the problem was caused by neglect, improper setup, or even trying to “DIY” a fix. Rheem expects routine maintenance—changing filters, keeping the area clear, annual checkups. If they find the system was misused or neglected, the warranty could be voided, just like entering the wrong sync code too many times can lock you out of your remote.
What To Expect During Repair Or Replacement
Once you’ve got the green light and your replacement part is on its way, here’s what happens. Your installer (or an authorized technician) will set up a time to come out and make the repair. They’ll bring the new part, install it, and test your system to make sure the reset was successful.
It’s important to remember that labor charges are rarely covered. So, even if the replacement coil or circuit board is free, you might have to pay for the installer’s time. Ask for a quote up front, so there are no surprises.
Most repairs are pretty quick, often done in a single visit once the part arrives. But if the unit has a more complex issue, or if the tech spots another unrelated problem (like a battery corrosion or faulty remote sensor), you might face extra costs for unrelated fixes. It pays to keep your system maintained and to ask questions—don’t be shy about learning what’s being done, step by step.
Tips To Make The Warranty Claim Process Smoother
Here’s the thing: a little prep work goes a long way. Before you ever need to claim your Rheem HVAC warranty, you can set yourself up for success.
- Keep all your documentation together: Make a “home systems folder” with receipts, model numbers, and warranty registration emails—digital or physical, whatever works for you.
- Put your installer’s contact info somewhere handy: If you run into problems, you won’t waste time searching for their number.
- Get regular maintenance: A quick tune-up once a year can prevent small issues from becoming big, and gives you proof that you’ve kept up with care if you ever need to make a claim.
- Don’t ignore small issues: That weird noise or flashing error code? Fixing it early can prevent bigger problems that might not be covered if ignored.
If your system starts acting up, don’t just reach for the universal remote or try random troubleshooting. Sometimes, a hard reset works, but more often, you’ll want a pro to check things out so you don’t accidentally void your warranty. And if you ever feel stuck, Rheem’s customer support team can walk you through next steps, even if you just need help finding the right code for your remote or understanding what “syncing” your registration actually means.
When A Warranty Claim Isn’t The Best Option
Some situations just aren’t worth the hassle of a warranty claim. For example, if your system is older and the warranty has lapsed, you’ll be footing the bill anyway. Or, if labor costs are so high that replacing the whole system makes more sense, it’s okay to consider alternatives.
You might also want to look at third-party extended warranties or home service plans, especially if your Rheem system is out of coverage but you expect more years of use. Just remember, those plans have their own rules—always read the fine print and compare coverage.
For little things, like syncing a new remote, changing batteries, or resetting your thermostat, DIY is fine. But for anything major under warranty, leave the troubleshooting and repairs to certified pros. That keeps your coverage safe.
Alternatives: Should You Consider A Universal Warranty Or Third-Party Plan?
Okay, so what if your Rheem warranty is expired or no longer valid? This is where some folks look into universal or third-party protection plans. These aren’t backed by Rheem, but rather by home warranty companies or extended service providers. They typically cover a wider range of brands and even include things like electrical systems, appliances, and more. Think of it as a universal remote for your home’s coverage.
There are pros and cons, though:
- Pros: Broader coverage across different products, usually includes labor, sometimes even covers appliances outside HVAC.
- Cons: You’ll pay a monthly or yearly fee, claims can take longer to process, coverage may have more exclusions, and some repairs require pre-approval or specific service technicians.
If you’re considering this route, compare providers and read reviews. Some are great, while others are, frankly, not worth the paper their plans are printed on. Bottom line: weigh the cost against potential savings, and decide what kind of peace of mind you want.
Wrapping Up: Make Your Rheem Warranty Work For You
Claiming a warranty for a Rheem HVAC system shouldn’t feel like untangling a wad of cords behind your TV. It’s about knowing what’s covered, having your paperwork in order, and following the right steps—just like syncing that complicated remote control for the first time. Register your product, keep your documents safe, stay on top of maintenance, and reach out for professional help when things go sideways.
If you ever get stuck, remember: you’re not the first (or last) person to fumble with warranty details. Take it slow, ask questions, and trust the process. Your Rheem system is a big investment—you deserve to keep it running smoothly, with a little help from that often-overlooked warranty safety net.