Honestly, finding the serial number on a GE laundry appliance can feel a bit like a scavenger hunt. Different models hide it in different spots, and it usually isn’t plastered right on the front where you’d expect. Don’t worry, though—I’ll walk you through the process step by step, with some insider tips, so you can get that code quickly and get back to more interesting things (like not doing laundry).
Why Your GE Laundry Appliance Serial Number Matters
Here’s the thing: the serial number on your GE washer or dryer isn’t just for show. When you want to register your appliance for warranty—or if you ever need tech support, a replacement part, or help troubleshooting—a customer rep will almost always ask for it. Without it, you could end up stuck, waiting longer for service or, worse, missing out on warranty coverage.
The serial number is GE’s way of tracking your exact model and production date. This helps them figure out what internal components you have, what firmware or code might be running inside (yep, even appliances have code!), and when your warranty started. You might be wondering why this matters for repairs—well, even the same model of washer might change slightly from year to year. That one tiny difference can affect which parts fit or how a service tech resets or pairs internal electronics.
If you’re syncing your appliance with smart home systems, some GE washers and dryers also use the serial number and model tag for app registration. So it’s not just a random number to jot down—it’s a key to making everything work together, from warranty claims to remote troubleshooting.
Common Places To Find The Serial Number On GE Washers
Let me explain: GE washers, especially modern ones, like to hide their serial numbers in a few “favorite” spots. The trick is to look for a silver or white sticker (sometimes called a rating plate or tag) with both the model and serial number printed clearly. Here’s where to check, step by step:
- Open the washer door or lid. For most front-load models, look on the inside edge of the door opening—either on the door itself or the rim.
- Check the back of the control panel. Some top-loaders place the sticker just behind where you select your cycles. Sometimes you’ll need a flashlight.
- Look on the back of the machine. If it’s not inside, unplug the washer and gently slide it forward to check the rear panel, especially the upper corners.
- Side or base of the cabinet. Rarely, you’ll find the sticker along the side (visible if you pull it away from the wall) or underneath the lid, near the hinges.
If you’re feeling like a detective at this point, you’re not alone. A customer once told me it took three tries and a phone flashlight, but she finally found her serial near the hinge, hiding in plain sight. Don’t be afraid to check all around—manufacturers aren’t always consistent year to year.
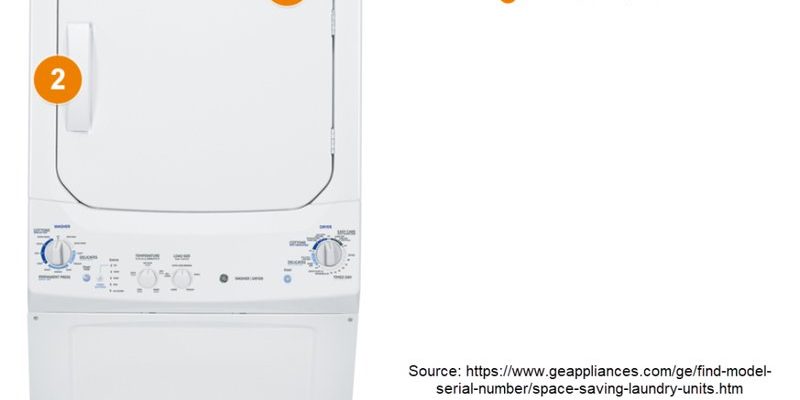
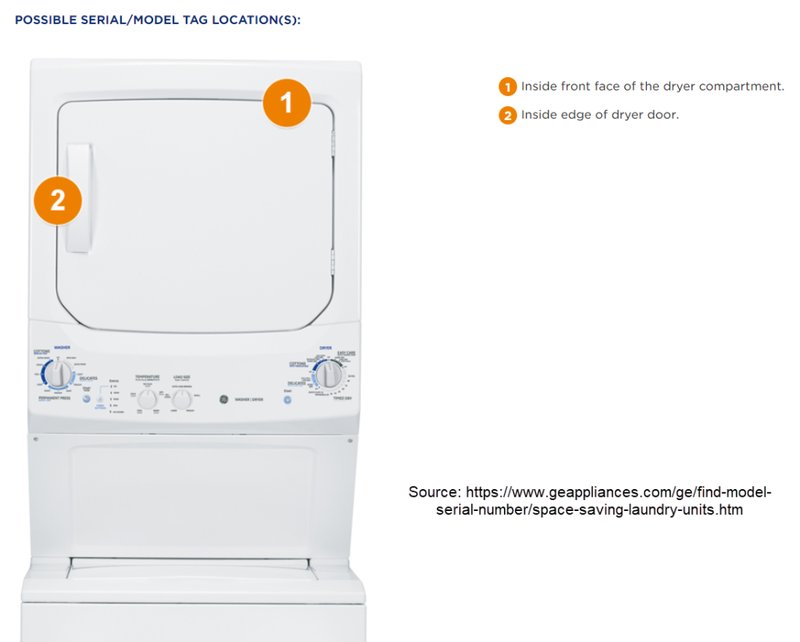
How To Locate The Serial Number On GE Dryers
GE dryers usually follow the same hiding spots as washers, but with a couple of extra tricks. Again, you’ll want to look for a sticker or metal plate with printed letters and numbers—never just etched or stamped.
- Open the dryer door. Check the frame around the opening and on the door itself. Sometimes the serial shows up near the latch.
- Peek behind the lint trap. For models with a top lint filter, remove the filter and look underneath or around the opening.
- Control panel area. Just like with washers, the sticker might hide behind or beneath where the cycle buttons and dials are.
- Rear or sides. For older models or large-capacity units, you might need to gently move the dryer away from the wall and check the backside or along the side panels.
One caution: always unplug your dryer before moving it, especially if you need to tip it forward or pull it out. That’s not just for safety—it also helps avoid accidentally resetting any code or pair settings on advanced, smart models.
Understanding GE Serial Numbers: What They Look Like
So, now you’ve found that magical sticker. But what do all those numbers and letters actually mean? GE serial numbers usually follow a pattern—often two letters followed by several numbers, like LL123456G. The model number will also be on the sticker, but for warranty and troubleshooting, the serial is what’s important here.
- Two-letter prefix (e.g., “LL”): Indicates the manufacturing month and year. GE uses a code for this, which can be found on their official site if you’re curious.
- Six digits: A unique production number.
- One-letter suffix (sometimes): Refers to plant location or a production run.
Why does this format matter? If you’re registering the appliance online or talking to a tech, they’ll ask for the number exactly as it appears—including any letters. It helps GE instantly know your model’s age, version, and eligible warranty dates. Some smart appliances also use this serial when you sync them to the GE appliance app or when doing remote diagnostics.
The moral of the story: don’t just write down the number—snap a photo with your phone so you never lose it.
What To Do If You Can’t Find The Serial Number
You might be wondering, “What if my sticker is missing, scratched, or completely unreadable?” Don’t panic—there are still a few options.
First, check your original paperwork or the back of your owner’s manual. Sometimes, installers or retailers jot down the serial number during delivery and setup. If you registered your machine when you bought it, GE’s warranty site might also list the serial number for you—just log in with your email and appliance info.
If all else fails, call GE’s customer support. Have your proof of purchase handy (like a sales receipt), and they might be able to help based on your address, delivery date, or model number alone. In rare cases, a GE technician can “reset” or “pair” some smart modules at your home and extract the serial from the appliance’s onboard code. That’s a last resort but worth knowing about.
Don’t try peeling off stickers or digging into the control panel yourself—this could void your warranty or cause more damage.
How The Serial Number Impacts Your Warranty And Service
Let’s break it down: without a valid serial number, GE can deny your warranty claim, even if you’re still within the coverage window. That’s because the serial lets them verify exactly when and where the appliance was made and sold. No serial? No service. It’s that simple.
The serial also tells GE what parts your appliance needs. Even if you’re only calling for basic troubleshooting, their system uses that number to pull up technical manuals, compatible replacement parts, and any “reset” processes that are unique to your version. For example, if there’s a known pairing issue or battery fault in your remote start module, GE can check if your serial falls within the affected batch.
If you move homes and bring your laundry appliances with you, having the serial number makes transferring or updating your warranty much easier. And when syncing devices in a smart home system, the app might require the serial to properly connect and code your washer or dryer to your home Wi-Fi.
Registering Your GE Appliance For Warranty: What You Need
Once you’ve tracked down that serial number, it’s time to actually register your appliance. GE offers both online and phone registration, but either way, you’ll need a few pieces of info:
- Serial number (exact match, with all letters and numbers)
- Model number (on the same sticker or tag as the serial)
- Date of purchase (from your receipt or delivery slip)
- Your contact info (address, phone, and email)
Head to the GE Appliances warranty page, enter the details, and you’ll get a confirmation email. This comes in handy if you ever need to reset or troubleshoot an error code in the future—the service tech will pull your records by serial number and model in seconds. In most cases, this is also where you’d start if pairing a universal remote or using advanced app features like voice control or smart sync.
Honestly, I recommend registering even if you’re not sure you’ll need repairs. It makes warranty claims way smoother, and if you ever sell your home with the appliances included, it’s a nice little bonus for the new owner.
GE Universal Remotes, Smart Sync, And Serial Number Use Cases
You might be surprised, but your serial number isn’t just for repairs. On some GE smart laundry appliances, you can sync them with universal remotes, home automation hubs, or the official GE app for remote control and monitoring. Here’s how the serial comes into play:
- App registration: Many smart features won’t activate until you enter your model and serial during setup.
- Universal remote pairing: If you’re trying to pair a GE universal remote with your washer or dryer, the system will often ask for your serial to load the correct code or firmware.
- Troubleshooting and battery replacement: If you’re setting up or resetting smart features that rely on battery-powered modules, support reps may need your serial to guide you through the process.
- Firmware updates: GE sometimes pushes updates or fixes based on serial ranges, so entering the correct number ensures you get the right download.
So, even if you never call for repairs, having that serial number on hand saves you time and headaches. It’s the tiny detail that keeps your high-tech laundry system running smoothly.
Final Thoughts: Keep That Serial Number Handy
Tracking down the serial number on a GE laundry appliance isn’t always the most thrilling five minutes of your day, but it really does pay off when you need warranty help, parts, or support. Now you know where to look, what those codes mean, and why this small sticker matters so much. My honest advice? Snap a quick photo with your phone, jot it down in your household binder, or save it in your notes app—future you will thank you.
It’s a small step that unlocks a lot of convenience, from syncing new remotes to troubleshooting with GE support. No more wild goose chases behind the washer or second guesses at serial numbers when it counts. If you’ve followed the steps here, you’re set—now let your laundry machine do the work, and keep that warranty peace of mind in your back pocket.