You might be wondering, “Where on earth is this elusive serial number hiding?” It’s not always staring you right in the face. GE ovens and ranges come in various designs, and the serial number could be tucked away in multiple spots. But don’t worry—finding it is usually straightforward once you know where to look. Let me explain exactly where you should check, what the serial number looks like, and why you’ll want to keep it handy.
Why The Serial Number Matters for Your GE Oven or Range
Here’s the thing: the serial number isn’t just a random string of letters and numbers. It’s the official ID for your specific appliance. When you call GE customer service, want to register your product, or need warranty repairs, this number tells the company exactly which oven or range you’ve got. It’s like giving them your VIN number if you had a car.
Without this serial number, identifying your model and verifying warranty status gets tricky. You might end up waiting longer or even paying for repairs that should’ve been covered. So, tracking down that serial number isn’t just a formality—it can save you time, money, and headaches later on.
Also, when you look it up, you’ll usually see a model number nearby. The model tells you what type of appliance you have, but the serial number confirms the exact unit. This helps with troubleshooting, syncing replacement parts, or even checking for recalls.
Common Locations to Find the Serial Number on GE Ovens and Ranges
Finding the serial number is a bit like a scavenger hunt—but it’s less “Where’s Waldo?” and more “Look behind the scenes.” GE usually places the serial number label in a few predictable spots. Here’s where to start looking:
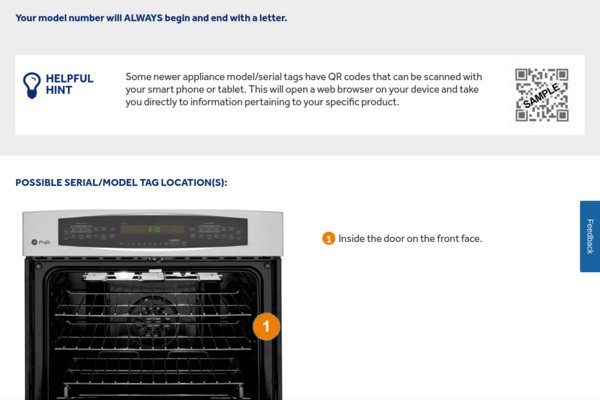
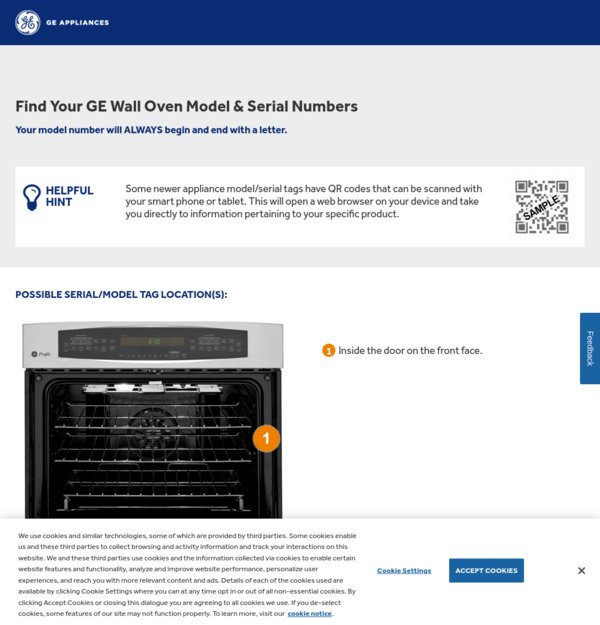
- Inside the oven door frame: Open your oven door fully. Look along the inner frame—either on the side or bottom edges. Sometimes the sticker is right on the hinge side.
- Under the cooktop: On some range models, the label is stuck under the cooktop section. You’ll need to carefully lift or tilt the cooktop (make sure it’s cool and unplugged!) to see underneath.
- Back of the appliance: If you can safely move the oven or range, check the very back. The sticker might be on the lower back panel.
- Drawer or storage area: Some models with a warming drawer or storage drawer might have the label inside that drawer’s frame.
If you’re feeling cautious about bending or moving parts, start with the oven door frame first—that’s often the easiest and least risky spot.
Why Can’t It Just Be Easy?
GE designs different models for various kitchens, so the location isn’t identical everywhere. It’s a bit like trying to find the car’s VIN number—sometimes it’s on the dashboard, other times under the hood. The good news is that once you know these common places, it becomes second nature.
How To Identify the Serial Number Format on GE Appliances
You might see several numbers and codes on the label, so which one is the serial number? GE serial numbers usually mix letters and numbers. Typically, it’s a string like this: **1234ABC5678**. The important bit is that it’s unique for your appliance.
Here’s a quick way to spot it:
- The label often says “Serial Number” or “S/N” right next to it.
- It’s usually a 10 to 12 character code combining letters and numbers.
- Sometimes the serial number starts with a letter followed by numbers, or vice versa.
These labels may also include the model number, manufacture date, and other codes used for syncing or resetting devices during troubleshooting.
If you happen to be looking at the label trying to pair this with warranty details, keep the serial number handy exactly as it is—no shortcuts or skipping characters.
Step-by-Step: Finding Your GE Oven Serial Number Safely
Let’s walk through the process like you’re right in your kitchen:
- Turn off and unplug your oven or range. Safety first! You don’t want any accidental burns or shocks.
- Open the oven door fully. Get a good look at the inner frame where the door meets the oven body.
- Check each side of the oven door frame. The serial number label is often on the left or right side near the hinges or bottom.
- If you don’t see it there, carefully lift the cooktop (range models only). This might take a gentle lift or a slight tilt, but no force. Look underneath for a sticker.
- As a last resort, move the oven or range slightly to peek behind it. The label could be at the lower back panel.
- Write down or take a clear photo of the serial number. This helps if you need to contact GE support later or register the product online.
If this sounds a bit intimidating, you’re not alone. Most people find it easier to turn on a flashlight and lean in close. The text on the label can be tiny and a bit worn, especially in older models.
What To Do Once You Find the Serial Number
Now that you’ve tracked down that precious serial number, you’re in a good spot. Here’s your playbook for the next steps:
- Register your GE oven or range online. This activates your warranty and makes future service smoother.
- Keep a copy of the serial number somewhere safe. Maybe a photo on your phone or written in a home maintenance log.
- If you’re troubleshooting or calling support, have the number ready. It helps technicians identify your exact model and any relevant recalls or updates.
- Use the number for ordering genuine GE parts. This ensures compatibility if you ever need to replace a heating element or control panel.
Here’s the thing: don’t just assume you won’t need it. Storing these details now saves a frustrating scavenger hunt later.
Dealing With Missing or Damaged Serial Number Labels
Sometimes, the sticker is missing, faded, or just plain unreadable—especially if your oven has been around the block a few times. What then? Don’t panic.
First, check your original purchase documents, manuals, or emails. Often, the serial number is printed there.
If you can’t find it, call GE customer service with your model number and appliance details. They can often look up warranty status based on purchase information or send a technician to help (especially if you’re dealing with repairs).
If the serial number sticker is peeling or unreadable, you might want to carefully replace it with a label noting the number, once you figure it out. This keeps things neat and handy for the future.
Why This Matters More Than You Think
Honestly, finding the serial number on your GE oven or range is like uncovering a secret password to your appliance’s support system. It’s the key to syncing warranty info, verifying coverage, and even troubleshooting with confidence.
Whether it’s resetting a control board or pairing replacement parts, having the serial number at hand speeds things up. It also stops you from accidentally buying the wrong parts or losing warranty benefits.
So, the next time you’re standing in your kitchen wondering about that label, remember: a few minutes spent hunting it down now can save hours and dollars down the road.
—
At the end of the day, your GE oven or range is more than just a cooking machine—it’s a partner in your daily routine. Treat it well by keeping track of the serial number. It’s a simple step that pays off big when you need warranty help, repairs, or troubleshooting. Now that you know where and how to find it, you’re ready to take control and keep your appliance running smoothly for years to come.