Now, Ring has designed its mobile app to make this registration process as painless as possible, but if you’ve never done it before, it can still feel a little confusing. You might be wondering how to “pair” the device, why the app asks for a QR code, or what to do if your device won’t sync. Don’t worry — with a few straightforward steps and some troubleshooting tips, you’ll have your Ring devices registered and ready to go in no time.
Why Register Your Ring Device Through the Mobile App?
Honestly, registering your Ring device via the mobile app is the gateway to unlocking all its smart features. Without registration, your device is just a fancy gadget, kind of like a phone without a SIM card. The app acts as the brain and remote control, letting you monitor your home from anywhere.
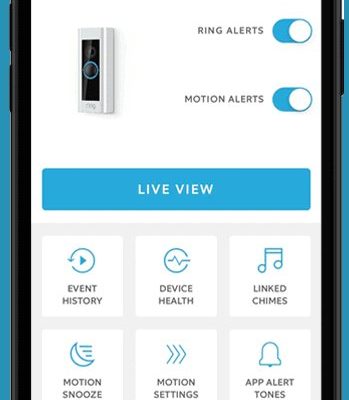
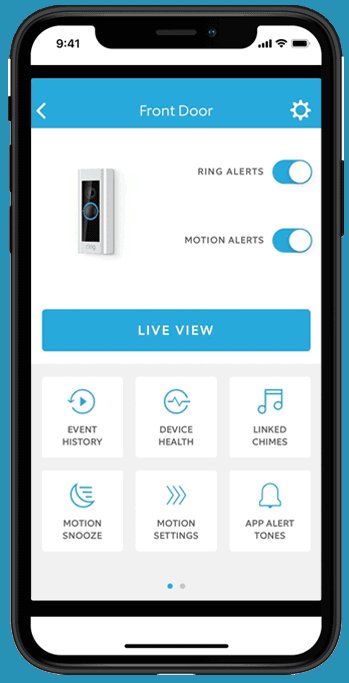
By registering, you link the device to your personal Ring account, which is critical for security and functionality. This connection ensures that you get instant notifications about motion detection, live video feeds, and crucially, control over settings like privacy zones and motion sensitivity. The app also allows your Ring device to receive firmware updates, so it stays sharp and secure.
Plus, registration lets you invite family members or roommates to access the device remotely. Rather than everyone fumbling for the same physical remote or key, the app keeps everything smooth and simple.
What You Need Before Starting the Registration
Before diving in, it helps to gather a few essentials to save time and headaches. Here’s a quick checklist:
- Your Ring device fully charged or connected to power (battery status matters!)
- A smartphone or tablet with a stable Wi-Fi or mobile internet connection
- The latest Ring app installed on your device, available on both iOS and Android
- Your Ring account credentials (email and password), or be ready to create a new account
- The device’s Quick Response (QR) code or MAC ID, usually found on the box or back of the device
Here’s the thing: skipping any of these steps can cause frustration midway through registration. For example, if your phone’s Bluetooth or location access isn’t enabled, the app might not detect your device. Also, ensure your home Wi-Fi is working well since the Ring device will sync through it.
Step-by-Step Guide to Register Your Ring Device in the App
Let me explain the registration process like I’m walking you through setting up a new video game console — some steps require patience, but it’s straightforward.
1. Open the Ring App and Log In
Start by launching the Ring mobile app. You’ll either see a login screen or the option to create a new account if you haven’t already. Enter your email and password carefully — typos here can delay things. If you’re new, creating an account only takes a couple of minutes and is essential for device syncing.
2. Tap “Set Up a Device”
Once logged in, look for the “Set Up a Device” button. It’s usually front and center or under the menu options. The app will ask what type of device you’re registering — choose the one matching your Ring product, like Video Doorbell, Security Camera, or Alarm.
3. Scan the QR Code or Enter the MAC ID
Here’s a tiny snag sometimes: the app wants the device’s unique identifier. Most Ring devices have a QR code on the back or in the packaging. Use your phone’s camera to scan it directly within the app. If scanning fails, you can manually type the MAC ID, a string of letters and numbers also on the label.
4. Connect the Device to Your Wi-Fi
Next comes syncing the device to your home network. The app will prompt you to select your Wi-Fi and enter the password. This link is vital—it’s how your Ring device talks to your phone. Make sure you enter the password correctly because even one incorrect letter will cause connection problems.
5. Finalize the Setup and Test the Device
When your device successfully connects, the app will confirm registration. This step often includes a test notification or live video preview, so you know everything’s working well. If you don’t see this, the app usually provides troubleshooting tips.
Common Issues When Registering and How to Fix Them
You might hit a bump or two along the way, and that’s perfectly normal. Here are some common problems and how to handle them.
- Device not found during setup: Make sure Bluetooth and location services are enabled on your phone. Also, double-check the device has power or battery life.
- Wi-Fi connection fails: Devices that only support 2.4 GHz Wi-Fi won’t work on 5 GHz networks. Verify your router settings and try reconnecting.
- QR code won’t scan: Clean your camera lens and ensure good lighting. Alternatively, enter the code manually.
- App freezes or crashes: Restart your phone, update the app, or reinstall if necessary.
If things still don’t click, there’s always the option to reset your Ring device — usually by pressing and holding a reset button for a few seconds. This wipes previous settings and lets you start fresh.
Why Syncing and Registering Your Ring Device Matters for Security
Here’s the thing: your Ring device acts as your virtual sentry, keeping tabs on your home when you can’t be there. Syncing it properly through the app doesn’t just enable basic functions—it’s your lifeline to real-time alerts and peace of mind.
Imagine if your camera missed an alert because it wasn’t registered or synced correctly. That gap could mean missing an important notification or video clip. Registration also helps Ring send critical firmware updates, patching security flaws and improving device stability.
Plus, if you ever lose your phone or suspect unauthorized access, you can quickly manage device permissions through the app, adding a layer of control without needing complicated reprogramming.
Comparing Ring’s Mobile App Registration to Other Methods
You might ask, “Isn’t there a way to register via desktop or USB?” Honestly, Ring’s system is built around mobile first. The app’s integration with your smartphone’s camera makes scanning QR codes a breeze compared to typing long codes on a PC.
Some older or universal remotes require manual code entry or syncing via physical buttons, which feels clunkier. Ring’s approach lets you handle everything from your couch, adding convenience.
That said, if your phone isn’t cooperating, the Ring web dashboard can help manage devices after initial registration, but the registration itself needs the mobile app to sync device credentials securely.
Maintaining Your Ring Device After Registration
After you get past the registration hurdle, maintaining your Ring device is the next priority. Here are some simple tips:
- Check battery levels regularly. Low battery can cause intermittent connection or alerts.
- Keep your app updated so you benefit from the latest features and bug fixes.
- Monitor your Wi-Fi strength near the Ring device; weak signals can disrupt syncing and video quality.
- Use the app’s troubleshooting tools if you notice lag, missed alerts, or erratic behavior.
Strong maintenance habits mean your Ring device stays responsive and trustworthy — no one wants to find out their security camera stopped working right when they need it most.
Remember: registering your Ring device isn’t just about getting it to work—it’s about keeping your home connected and protected.
In the end, registering your Ring smart home devices through the mobile app is like building a bridge between your device and your daily life. It takes a few steps, but once it’s done, you gain full control, instant notifications, and peace of mind. So, grab your phone, follow the steps, and enjoy a smarter, safer home.