Plenty of folks miss this last step and only remember when it’s time to make a warranty claim. And let’s be honest, no one wants to be stuck hunting for serial numbers or receipts when the HVAC is down and the house feels like a sauna. So, let me walk you through, step by step, how to register your Trane HVAC system for warranty online. We’ll cover what you need, why it matters, and how to dodge common trip-ups—think of it like connecting the final piece of the puzzle.
Why Registering Your Trane HVAC Warranty Online Matters
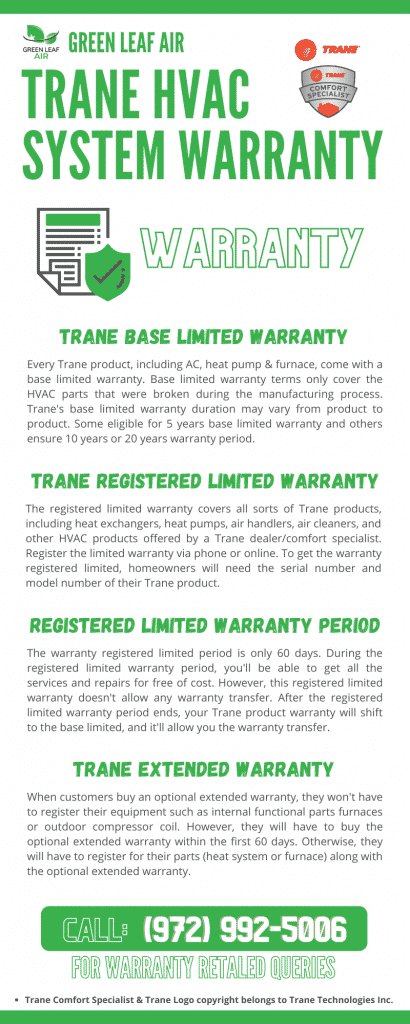
Here’s the thing: buying a Trane HVAC system is an investment—not just in cooling or heating, but in the comfort and safety of your home. But that investment isn’t fully protected until you activate the warranty. Registering online isn’t just a formality; it can make a big difference if you ever need service. Trane offers extra warranty coverage when you register within 60 days of installation, and missing this window could mean you lose out on benefits you’ve already paid for.
Imagine your HVAC stops working on a blazing-hot day, and you call for service—only to find out your system isn’t registered, so you’re on the hook for the full repair bill. That’s a headache no one needs. Registering your Trane product online syncs your purchase to the manufacturer’s system, so if there’s ever an issue, your coverage is already documented. Plus, the online registration process is straightforward—no need to shuffle through the old-school paperwork or mail anything in.
For many homeowners, the idea of registering something online is about as appealing as resetting a stubborn remote or changing the batteries in a smoke detector—basically, it lands at the bottom of the to-do list. But for Trane systems, online warranty registration is the shortcut to future-proofing your comfort.
What You Need Before Registering Your Trane System
Let me explain what’s needed up front so you’re not halfway through the registration, only to hit a dead end searching for information. Trane, like most brands, requires a few key details to complete the online warranty registration:
- Model and serial number of your HVAC unit—usually found on a metal plate attached to the unit itself. Grab your phone and snap a photo; trust me, squinting at numbers twice is no fun.
- Date of installation—this is the day your system was up and running, not just delivered. Your installer or receipt usually has this.
- Name and contact info—the basics: your name, address, phone, and email.
- Dealer or installer information—Trane likes to know who put your system in. Again, your invoice is the goldmine here.
- Proof of purchase—some people add a photo or scan, just in case there’s ever a question about when you bought it.
It’s a bit like gathering your ingredients before you bake a cake—having everything in arm’s reach saves you lots of hassle later. If your system is older or you’ve recently moved into the house, you might need to do a little detective work, but usually, it’s all on the paperwork your installer gives you.
Step-By-Step: How To Register Your Trane HVAC Warranty Online
Okay, let’s cut to the chase and walk through the process—the digital equivalent of pairing a remote or resetting a thermostat. Here’s how to register your Trane HVAC system for warranty online, in plain English:
- Visit the official Trane registration page. Start at Trane’s warranty registration site (always double-check you’re on the real Trane site for security).
- Fill in your product information. You’ll enter the model and serial number of each unit. Go slowly—sometimes a single letter or number can trip up the form. If the code doesn’t work, double-check that photo you took earlier.
- Add your details. Enter your contact info and address—this syncs your warranty to your home.
- Enter installation and dealer info. Supply the install date and details about the company or person who did the work. If you had a professional installation, you’re in the clear here.
- Review and submit. Double-check everything before clicking submit. Some systems even let you add proof of purchase or additional comments.
You’ll usually get a confirmation email within minutes, and some users get a registration code or tracking number—keep this handy! If you don’t see a confirmation, check your spam folder or try again. Simple, right? Like syncing a new remote, it’s just a matter of following the sequence.
Common Issues During Trane Warranty Registration (And How To Fix Them)
Let’s be real—technology sometimes has a mind of its own, especially when you’re trying to pair a new device or input a long string of numbers. The same goes for online warranty registration. Here are a few trip-ups people run into, and the fixes:
- Serial number or model code won’t work? Double-check for typos. Sometimes a “0” looks like an “O” or a “1” looks like an “I.” If you’re sure it’s right, try entering it in all caps. Still stuck? Call your installer or dealer—they can help reset or verify the code.
- Website glitches or won’t load? It happens. Try switching browsers, clearing your cache, or resetting your internet connection. If it still doesn’t work, Trane’s customer service is usually quick to respond.
- Can’t find your installation date or dealer info? If you don’t have this, look for your invoice or contact the company that installed your system. Most reputable installers keep records and can send these details quickly.
- No confirmation email? Check your spam or junk folders. Sometimes these emails get filtered out by mistake. If you don’t see anything within a couple hours, it’s worth contacting Trane support just to be sure your registration went through.
If you get stuck, don’t sweat it—this part is often easier than trying to troubleshoot a universal remote that just won’t sync.
Tips For Keeping Your Trane Warranty Valid
Registering your warranty is just the first step—think of it like putting batteries in a remote. But there are a few things you need to keep in mind to make sure your Trane warranty stays active and ready if you ever need it:
- Don’t miss the registration window. Most Trane warranties require you to register within 60 days after installation for full coverage. If you forget, you may get standard coverage, but not the extended perks.
- Keep your records safe. Store your confirmation email, registration code, and proof of purchase somewhere easy to find—like a folder in your email or a cloud drive. It’s way easier to pull this up when you need service.
- Schedule regular maintenance. Many warranties require proof of annual maintenance. Even if it’s not mandatory, regular tune-ups can prevent the kinds of problems that void warranties.
- Know what’s covered (and what isn’t). Some things don’t fall under warranty—like cosmetic damage or issues caused by DIY repairs. Check the fine print so there are no surprises.
Treat your warranty like you’d treat a backup remote or spare set of keys—something you hope you never need, but you’ll be very glad you have if the time comes.
Trane HVAC Warranty: What’s Actually Covered?
You might be wondering, “What does this warranty even do for me?” That’s a smart question, and it’s worth slowing down to spell it out. Trane’s registered warranty covers big-ticket items like the compressor, coils, and internal components—basically, all the important parts that keep your HVAC humming.
Here’s a quick look at the usual coverage:
- Compressor and coils—These are the heart of your system and can be pricey to replace. With your warranty registered, they’re protected for years.
- Parts and labor (sometimes limited)—Most warranties include parts for the first 10–12 years. Labor coverage can be shorter or require additional plans.
- Original owner coverage—In most cases, the best coverage applies to the first registered homeowner. If you sell your home, check if the warranty can transfer—sometimes it’s as easy as filling out a form.
Of course, if you use a universal or off-brand remote to try and reset, code, or troubleshoot the system, and something goes awry, certain repairs might not be covered. Always check with an authorized dealer or your warranty terms before making changes.
Alternatives: Phone and Mail-In Registration (And Why Online Wins)
If online registration just isn’t your thing, you actually have other options. Trane still offers warranty sign-up by phone or traditional mail. Sounds old school, right? But if you’re having trouble syncing with the website, the other methods aren’t bad in a pinch.
- Register by phone—You’ll still need all the same info (serial number, install date, dealer, etc.). Call Trane’s residential support line and follow the prompts. Just be ready for a little wait time—everyone’s patience gets tested here.
- Mail-in forms—Dealers sometimes hand these out. Fill them out clearly, attach a copy of your receipt, and mail to the address listed. But honestly, this takes much longer to process, and you’ll have to wait for confirmation by mail.
Compared to these, the online system is faster, easier to track, and syncs your details instantly into Trane’s database. Plus, you’ll usually get confirmation in your inbox right away, which feels like finally pairing a remote on the first try.
Final Thoughts: Registering Your Trane Warranty is Worth the Few Clicks
Registering your Trane HVAC system for warranty online is one of those adulting moments that pays off later. It’s quick, protects your investment, and prevents a world of headaches if your system ever needs a repair. Like replacing the batteries in your remote before they die, a few minutes now can save you hours of frustration in the long run.
So gather your model and serial numbers, double-check your install date, and head over to the Trane website. You’ll sleep easier knowing you’ve got backup—no more missing puzzle pieces, no worries about getting left in the heat (or cold) if your system ever stalls. And if you do run into a snag, Trane’s support is there to help you reset, sync, or troubleshoot the process. Now that’s comfort you can count on.
