Honestly, digging into warranty policies can feel like trying to read another language. The fine print can be overwhelming, and you might be wondering where to even begin. Luckily, Rheem makes their warranty information accessible, but finding it requires a little guidance. Let me explain where you can locate the warranty policy, how to understand the key details, and why it truly matters for your peace of mind.
The easiest place to find the warranty policy for your Rheem HVAC system is right on Rheem’s official website. Think of it as the company’s own “manual” for how they’ll back you up if something goes wrong. Most manufacturers offer digital copies of their warranties because it’s the quickest way to update and share important information.
Once you’re on the Rheem website, look for a section labeled “Warranties” or “Customer Support.” They typically organize warranty documents by product type—like air conditioners, furnaces, or heat pumps. This helps you zero in on the specific warranty that applies to your exact unit. For example, a Rheem heat pump might have a slightly different warranty than a gas furnace.
You might also find a downloadable PDF, which is handy if you want to keep a copy on your phone or print it out. These documents usually break down warranty coverage terms, how long it lasts, and what parts are covered. Having this info at your fingertips means no guessing games when you experience a sync issue or a mysterious error code on your unit.
You know those thick booklets that come with your HVAC system? They’re more than just paperweight—they hold some of the most important details about your product, including the warranty. It’s like getting a user’s roadmap for your system, and the warranty section is usually tucked near the back.
If you’ve never glanced at the manual since installation, now’s a perfect time. For many Rheem units, there’s a dedicated warranty page or chapter that spells out the coverage period, what’s included, and what you might have to pay for. Manuals also often outline how to register your product, which can be necessary to activate your warranty.
Here’s a quick tip: if you misplaced the manual, don’t panic. Rheem also offers digital versions of their manuals online. Searching by your model number usually pulls up a downloadable copy—so you don’t have to wait around or call customer support just to find the warranty info.
Here’s the thing about warranties—they often only kick in after you officially register your product. Think of registration like signing up for a gym membership; you have to claim it before you can start using the benefits. Rheem usually encourages you to register your HVAC system shortly after installation.
Registration can be done online through Rheem’s website or sometimes through the dealer who installed your system. When you register, you provide basic info like model number, serial number, and installation date. This step is important because it helps Rheem track your system and speeds up warranty claims if something goes wrong.
If you skip registration, the warranty might still apply but sometimes only for a shorter period, or you might lose eligibility for enhanced coverage. Honestly, taking five minutes to register can save you hours and headaches later—especially if your unit needs troubleshooting or a part replacement.
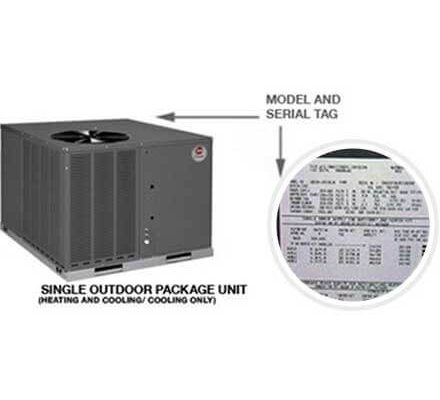
You might think, “Can’t I just check my unit for warranty info?” Well, the answer is yes and no. Rheem HVAC systems usually have a label or sticker somewhere on the unit that includes the model and serial number but not the full warranty policy.
This label is like a machine’s ID card—it’s how Rheem identifies exactly which model you have, which is crucial for looking up warranty specifics. You’ll often find this sticker inside the access panel or on the side of the outdoor condenser.
Knowing your model and serial number from this label makes it easier to find the right warranty documents either online or when talking to customer service. So, while the unit itself won’t list the warranty terms, it holds the key information you’ll need to track down the policy quickly.
Sometimes, even after you hunt down the warranty documents, you’ll still have questions. Maybe the warranty language feels too technical, or you’re unsure if a particular repair is covered. This is when calling Rheem’s customer support can be a lifesaver.
Rheem has dedicated support teams ready to help with warranty inquiries. When you call or email, keep your model number, serial number, and purchase details handy. This helps them pull up your exact system info quickly. They can explain warranty coverage, walk you through the claim process, or even guide you on troubleshooting steps like syncing your system or resetting the remote control.
Here’s a little insider tip: if your system was installed by a professional dealer or contractor, they can also be a helpful middleman. Many times, they handle warranty claims on your behalf and know the ins and outs of Rheem’s policies.
So, you’ve found the warranty policy, but what does it really mean for you? Rheem’s warranties usually cover defects in materials and workmanship for a set period, often between 5 to 10 years depending on the product. This means if your compressor fails or a critical part breaks down due to a manufacturing issue, Rheem steps in.
However, here’s where it gets a little tricky. The warranty typically won’t cover problems caused by improper installation, lack of maintenance, or external damage—like a squirrel chewing through wires (true story, by the way). That’s why regular upkeep and professional installation are important if you want your warranty to hold up.
Additionally, some parts might have different coverage lengths. The heat exchanger and compressor often have longer warranties than smaller components. Understanding these differences helps you know what to expect if your system needs a part replaced or repaired.
Imagine this: your Rheem system suddenly stops cooling right in the middle of a heatwave. You check the manual, find the warranty, and breathe a small sigh of relief—should you? Here’s the thing: you need to know the steps to actually use that warranty.
First, verify that your system is still within the warranty period and covered for the particular issue. Then, contact the installer or Rheem customer service to begin the claim. Often, the process involves having a certified technician inspect your unit to confirm the problem.
If your repair is covered, Rheem generally pays for the replacement parts, but labor charges can vary depending on who you hire. Keep in mind, maintaining your system with recommended checks and using the right settings (like syncing your thermostat or resetting the remote after power outages) can prevent breakdowns and preserve your warranty.
Honestly, understanding your Rheem warranty is kind of like carrying a first-aid kit. You might never need it, but when something goes wrong, it’s absolutely critical. Knowing where to find your warranty policy, what it covers, and how to use it can save you serious money and stress.
Plus, having clear warranty info helps you troubleshoot minor issues yourself, like resetting the system or fixing a remote control sync problem, without immediately calling in the pros. It gives you confidence to enjoy your HVAC system without the constant worry of “What if it breaks?”
At the end of the day, your Rheem HVAC system is a big investment in your home comfort. Getting familiar with your warranty policy is just smart care for that investment—kind of like reading the map before you take a new road trip.
So next time you’re setting the thermostat or checking your system, remember: your warranty policy is closer than you think, whether it’s tucked inside a manual, saved online, or just a call away from a helpful customer service rep.